For this month’s guest post, I’m pleased to bring you this very popular artist and instructor from Australia. I’ve heard so many people say, “I wish I knew how Stephie Clark paints her flowers.” Well, you’re about to find out!
Don’t know Stephie’s work? Check this out!

Before I hand you over to Stephie Clark, let’s find out a little bit about her!
Stephie Clark Bio
Stephie Clark is an Australian-based soft pastel artist, best known for her uninhibited exploration of the natural world. Self-taught, Stephie began her love affair with soft pastels in 2011, cultivating inspiration from the Impressionism art movement and her close observation of beauty in nature. She is also drawn to nature photography and uses many of her original photographs as references in her soft pastel paintings. See more of her work here.
And now, over to Stephie!
***
Creativity shows itself in all sorts of ways at various times of our lives…mine has always been based around colour; interior decorating, sewing, quilting and gardening…never art of any kind.
New Years’ Resolution time came around in 2011 and watercolour art struck an interest with me, so off to the library I went to study the how, when, and why of this medium, talk about a rabbit hole of joy and love. Then in November 2011, I went to visit a Picasso exhibition in Sydney and was incredibly taken by his early fine art. I was so moved by this one painting, grey jug with apples, that painting immediately became my next priority. Rushing to the closest art supplies store I asked for something I could paint with quickly….the sweet lady handed me a small container of Conte pastels – my lifelong passion in one box.
With watercolour on the backburner, I was immediately obsessed with the immediacy and tactile joy of placing a mark and watching the magic come to life on paper. Time-poor with a busy job, this medium was exactly for me; just paper, pastels, and me anytime, anywhere!

Squirrelled away in my home studio, I painted each and every day learning more about this magic medium and finding my way to sing my song in the language of florals. As a keen gardener, I only ever wanted to paint florals and fruits. I’ve spent hours at the library researching my favourite artists, totally taken with the 17th-century Dutch artists especially Jan van Huysum and of course the Impressionists Monet and Renoir. Adoration for the depth in these paintings became a bit of an obsession, and experimenting with many ways to produce that effect in my art has led me to the process I use today.
Firstly, observe, observe, and then observe….from the background to the in-focus foreground…watch the light in every plane; background, mid-ground and foreground. Visually separate the subject’s point of focus.
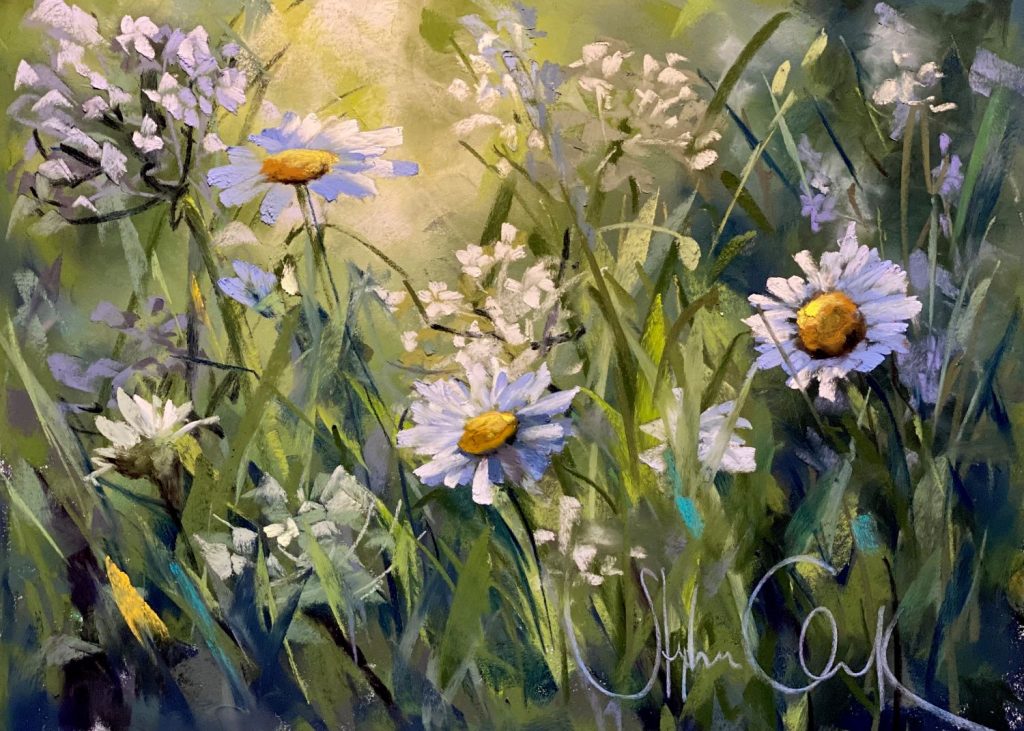
Commencing with the background, I may do a light sketch with the side of a pastel or pan pastel to check my composition and placement.
Then the fun bit begins. Using Pastelmat or Lux Archival paper, I start my backgrounds with light layers of pastels, slowly and gently applied, and then massaged into the depths of the paper. These layers are blended in a circular motion to create the ‘cloudy, romantic ethereal’ look I am after (thanks Renoir).


Peeling off the subject and everything in-between and attending to the darks, lights and values in my background, leaves me with a ‘map’ for where my subjects will be placed, like waypoints to build my creations.
Pulling the background into where my subjects will sit allows me to paint on top of the background beginning the creation of depth in my art. In the background, using a light touch with dry pastels is imperative.
Next, I focus on the mid-ground checking which leaves, petals, branches etc. sit behind and then paint them, accordingly, ensuring that hard and soft edges are used to develop that sense of depth and giving the viewer somewhere to escape to and enjoy the serenity of quiet strokes.


Stroke direction at this point is so important. We almost direct the traffic of our viewers’ eyes at this stage of our production…checking our light story again and focusing on our values to deliver drama where it’s needed. For me, it’s like making lasagna…gently layer, layer, and then layer again.
At this stage, it’s so important to check that your strokes are lost and found so the eye is drawn to where the focal point or points are. There can be more than just one mid-ground of course. I just look and make sure I am painting from the back to the front.


One particularly important point right here is that when these hard and soft edges are applied and gently manipulated and peaceful… LEAVE THEM ALONE… no blending, no touching with fingers as this will create mud! If you must go back over them, do it with a pastel or pencil. We are not looking for any detail in the mid-ground stage, just suggested detail.

I always strip my pastels of any paper wrapping as I am all about using the length of the pastel to create my strokes. I’m quite partial to any broken pastel pieces as they reveal total magic with unusual mark-making and sometimes even a gift from the pastel gods in the form of an incredible mark that can change the direction of my composition. Watch and listen to your painting as you build your piece and be open to artistic license for things to change. Freedom to ‘go with it’ and leave strokes imperfect is one of the things I treasure most while putting down my art.
Colour is the absolute cream in the pastel process for me, due to the fact that I’m a self-professed pastel tragic. I have thousands of these gorgeous sticks to play with and will rarely choose a specific palette. Rather, I use a box with suggested colours I see in my photo or still life setup. Studying the values and colours excite me no end and then interpreting them MY way, always painting from dark to light in my mid/foregrounds. Again, observation is key…

Each pastel has a unique ‘feel’ – some are creamy, some buttery, some so light they feel powdery. I love using dry pastels like Art Spectrum (AS) extra soft, JLuda, NuPastels, Unison Colour, and Mamuts as they have that dry subtle touch. Of course, there are exceptions to every rule and if I see the colour and value in another creamier variety, I will use it but sparingly so as not to flood the paper with pigment.
Interestingly, my darks are the pivotal point of my florals and fruit. I constantly tell my students, ‘Start darker than you think you need’, adding drama at every turn is how we create the depth and attract the viewer’s eye to discover the magic of pastels. When blocking in our mid-ground, constantly think, colour and shape. We are not searching for detail.

Starting with a value chart is important to identify the darks, mids, lights, and highlights and where these will be placed in order to portray drama and atmosphere. Simplifying into dark, mid, and light helps me no end with placement.
Having the security of my light source in my background, I can apply the value needed to create depth and dimension by layering my darks first. I often use 3-4 darks to build structure and my unashamed favourites are Sennelier 463 (deep blue) and 179 (black-green), and Terry Ludwig “eggplant.” I’m open to any deep umber and quite often use either the Sennelier (not sure of the number) or the JLuda umber.
With my darks down, I can move up the value chart and choose the hue that is required to work my way to the lightest pastel that I see in that specific area. So… in my work….the lightest dark will become the darkest light….reread that!

By using the mid-tones as the lightest darks and the darkest lights, we can set up harmony and quiet areas in our art which are just as important as the drama. It is a balance of colour, balance, and focus for me.
With the blended background highlighting our light source and the mid-ground containing planes of hard and soft edges on forms showing where the light gently caresses branches, leaves and foliage, we have set the stage for the divas.
At this stage, it is a rare thing that I will touch the painting with my fingers (again, rules are made to be broken) because our eyes are on a journey of learning about the subject from the back to the front. My light source is suggested in the background, again addressed in the hard and soft edges of my planes in the mi-ground. Now the light will explode on my focal point and disperse in a pleasing manner over the subjects that are in the light’s trajectory.

I keep stepping back to make sure that my darks are dark enough and often must go over and bump them up a bit if I’ve lost the dramatic shift from dark to light, remembering to paint each flower from the back to the front, again observing the order in how this subject comes towards us.
At this stage of my painting, I can see where the divas will be performing. I can not emphasize this enough – these florals will be painted with direct, intentional strokes…untouched by human hands! When blending is necessary, this will only be done with another pastel skimmed over the top of these strokes. Honestly you lose the beauty of mark-making if you play with foreground strokes…trust me I speak from a path well-worn from experience!
Each flower, no matter the direction it’s facing, has a back, mid and front. Paint them just as they grow. I start with the middle of the flower where the petals arise from and the stalk comes out, to give me a waypoint, somewhere to bring the petals into. Then from dark to light, I will use my values to create form, glazing the colours together to give Nature’s seal of approval for the hues she uses.

Slow and deliberate your strokes should be, with a known direction before you place the pastel on the paper. With the final highlight on the edge of your petals, take your pastel from the top edge of the petal and use a touch of pressure to drag down the pigment into the next value as you release your pressure et voilá…the glazing magic happens!
Focus on one area to portray detail to your viewer, explaining to them the light source, the composition, and the direction of the subject, then slowly lead them to areas where the light is less intense, and the detail implied with only a suggestion. I adore the way Renoir brings you into his art only to let you discover the edges of his subjects and your artistic eye paints the detail.
My process has been self-developed overtime and my techniques adjusted to suit the expectations of my own art, but the fundamentals stay the same:
- Paint from the background to the foreground
- Out of focus to focused
- Observe your light source all the way through
- Paint colour and shape when blocking in
- Dark to light
~~~~~
Wow! Sooooo much info there! So now you know how Stephie Clark does it! Her secrets are out.
We want to hear from you! Was that helpful? Do you have questions? Let us know your thoughts! 😀
And that’s it for now.
Until next time,
~ Gail










58 thoughts on “Stephie Clark – How To Create Depth In Florals”
Her work is stunning! She posts on Facebook and I have been a long time
admirer. Does she work from photos?
Great question Susan! I think so going by the one process set and reference photo (so interesting to see how Stephie changed things up!) but I’ll let her respond.
Gail, I so appreciate your emails, love the artists you select!! Stephie’s description of her process was wonderful!!
Thank You
Thank you so much for your enthusiastic response Barb! Really makes my day 😁
Thanks for showing these marvelous flowers with these explanations!! Fantastic painter I havé discovered!
Wow! That was great!
Her work is stunning. This was such a good and helpful explanation of her process. Thank you!
Whoo hoo Beth!! I’m so happy Stephie said yes to a guest post and that she was so generous with her explanations!
Thank you so much, yes I work from photos and life. During my process I exaggerate colour and change composition about so I can make the subject inspiration unique.
Wow, that was fantastic. I will read it again and again! Incredible work!
So great to hear Georgiana!!
There’s a boat load of amazing information in here. Thanks for offering this lesson Stephie and Gail!
Yes – LOTS to absorb isn’t there? So glad you found it a treasure trove Billie!
Stephie Clark has the most incredible !!!! vision, of seeing colours in the ordinary. In a lifetime I don’t think I will ever learn that…as hard as I keep looking. Will cherish this Blog, thank you so much for sharing.
Adrianne, I always LOVE when I hear a reader will cherish a blog – I know it’s hit the mark.
And I think you will see the colours and already do. Sink into it. And don’t be afraid to push any inkling of a colour that you see!
Hi, wow, I love Stephies work. I’ve always struggled with flowers, but then I do try to add too much detail. I love the step by step here and would buy the book if she had one! Perhaps that’s an idea to put to her😃.
Thank you so much for the blog and the chance to see and learn.
So glad you found it helpful Elaine! And I think good for Stephie to hear about your book idea/encouragement!!
Stephie has an incredible Patreon page that is loaded with lessons. Highly recommend.
What a gem of an artist is Stephie Clark and your process is so interesting. Thank you for your generosity!!! On some levels I felt as though I was looking over your shoulder as you explained in such magnificent detail, your wonderful process! Especially in terms of creating such beautiful flowers with depth and emotion. I will read this wonderful blog over and over to glen all the wonderful nuances that you so skillfully and generously revealed today. I find that painting flowers, for me, are the most challenging to convey depth, drama and emotion. Now I can begin to explore values, and light with new eyes as I approach my floral paintings, thanks to you Stephie. I wanted to know Stephie if you have any instructional videos available or are you teaching any upcoming virtual workshops? Thank you Gail! Happy painting!!🌻😊
So glad Stephie’s post resonated with you so much Denise!! You have lots to work on 😁
So much incredible information. I will definitely save this to return again and again. Thanks for sharing
I loooove that you will return to Stephie’s post again and again Lana. That’s music to me ears 🙂
Love this article, Gail, very useful! THANKS SO MUCH
You are sooooooo welcome Viviane!!
Stephie is a wonderful teacher, and gives so much of her self. Stephie instructs how.she.makes her marks as well stroke for stroke. Stephie is a gem!
I love her work. I love she is self-taught. Did not love the article. I think it would have been more meaningful if one or two pictures were presented and then break down the process. I guess if I get two things going for me this was worth the read. I am a visual learner, so I am a little lost about her process.
Yes, two out of three ain’t bad as you say Cheryl!
There is absolutely a lot to absorb from Stephie so I encourage you to come back and reread the whole thing again….and again…as others have suggested.
Stephie and I had hoped the series of images showing the process (as she explains it) would help with understanding the way she works.
Each guest provides content in their own way/style which for me always keeps thinks interesting. There’s no formula except to provide some valuable info and lots of images.
Thanks for the feedback! Always good to hear.
Thank you Gail for Stephie’s blog – I adore her work and have followed her on Patreon. And yet I found the blog to be VERY helpful in organizing all that she shares in all of her teaching. It is wonderful to watch her work but the blog brought all her dialogue to the forefront and was so worthwhile.
I actually will be keeping it on hand
That’s so great to hear Jeanne. Love that Stephie’s post works so well in addition to what she offers on Patreon!
Thought this was very revealing. It’s really such a simple concept to place layers on top of each other as you see them, from background to foreground, and her stunning work proves that it is effective. So much to reflect on and absorb, and TRY!! Looking forward to experimenting. Thank you for the great blog 🙏
Hey Joanna, yes, a simple concept. Let us know how you put it into play!!
Wonderful blog. Thanks Gail and Stephie. I admire both of you so much.
Awww Gisela, thank you so much!!
Fabulous article! I’m rarely moved by still life’s of flowers – they all look so similar, but these are so vibrant, I can feel a slight breeze blowing. These are works I’d be honored to hang on my wall. I’m working on some nature backgrounds as part of a bird series, and this article has inspired me. Being self taught, I love learning from other self taught artists.
Thanks!
This article from Stephie seems to have arrived at the perfect time for your own current work Lori. Love that serendipity!
A lovely post by Stephie Clark. And her work is beautiful.
I love the fact that she shares briefly about other creative avenues prior to finding art.
I am still a bit nervous to tackle foliage but I often find myself sitting in the garden watching the birds and light bouncing off or glowing through leaves and petals so this post has inspired me.
Stephie untangled the mystery with her methodical approach and the summary at the end was helpful.
After reading this I realise that it is no different to building up layers in any subject that I am comfortable painting. So I am definitely encouraged to turn the desire to paint into reality.
Gail thank you for being so generous in welcoming guest posts on your blog.
Yep I’ll he reading this one again
Melanie, thanks for sharing your tentativeness around tackling foliage. Love your description of looking (and seeing) – this is what artists do! And then we attempt to portray what we’ve seen and felt in out art. Do paint. foliage. Step by step.
And it’s my pleasure to bring the wisdom and work of many guests to this blog 😁
I was on Stephie’s Patreon page for a couple of years. It is wonderful to watch her work in just the manner she describes, sketching little or nothing, and letting her instincts for color and light work magic.
I was mesmerized by her process. I find I learn more when I reread an article like this after a bit of a break, so I also will save it. I have always been taught that your lightest dark is darker than your darkest light, but Stephanie said her lightest dark becomes her darkest light. Not certain it makes a lot of difference, but was struck by this difference. I am fairly new to pastels, so I am excited to try her process. Thank you for sharing this.
You are so welcome Suzanne! And both ideas are “correct” in that they teach you to look at the relativity of things. To look and see. And also to be aware of what value area you are working in and how it relates to another value area.
Wow! Such an articulate explanation of her process and why she does what she does. Amazing!
As a lover/painter of pastels this article was a incredible help to me. Thank you so much!
I love, love, love this process. Thank you Stephie! I really struggle with florals, and usually end up with a distracting hodge podge! I will be using this in future as a valuable resource.
So good to hear Nancy. I hope you’ll let us know how your experimentations with Stephie’s process goes!
Thanks to Stephie for giving such a clear and specific approach to pastel painting. I feel like I will be able to apply her words to my work immediately, no matter what the subject. Thanks, Gail!
Great to hear Maggie. Let us know how it goes especially in subject matter that’s not floral!
So VERY helpful. I have long admired Stephie’s work. I shall practise this. Thanks Gail for sharing this with us.
You’re so welcome John! Glad you enjoyed reading about Stephie’s process!
Stephies paintings are brilliant and she had been very generous with lots of practical advice. Thanks a lot Stephie. They sound very practical and doable. Practise, practise, practise is required to reach there. Thanks Gail for bringing these lovely nuggets of information.
Practice practice practice indeed is the key Ranjana!
How interesting this “the lightest dark becomes the darkest light”. I definitely had to re-read that
Yes Angie! The continuum of value and the idea of relativity comes into play!
Yes Angie! The continuum of value and the idea of relativity come into play!
Beautiful work and so helpful to learn from a learner! Thank you!!!!
Thanks, Gail, for this article from Stephie! She is absolutely amazing and her explanation of her technique was so helpful! She is a wonderful teacher and I have enjoyed her on Patreon. You’ve given us a gem in this presentation! Many thanks!
You are so welcome Eva! It was super fun to meet Stephie, albeit briefly, at IAPS in June!
Those flowers are so joyful and inspiring ! Going to save this writing to try her lessons. My garden is begging me to try. Thanks Gail!
Joyful indeed!! Love that your garden is “begging” you to do something with it Sandi! Let us know what happens.
Stunning! Awesome! Thank you Gail for inviting Stephie and thank you Stephie for being so giving of your talent and knowledge…