Don’t you just love when you come across a pastel painting you don’t recall seeing before?! This recently happened when I was cruising through the Philadelphia Museum of Art for examples to use in a Looking at Art session in my IGNITE! Art-Making Membership. A portrait by Mary Cassatt caught my eye but darn, the subject I was covering at the time was composition and it just didn’t “fit.” The tutorial this month, however, is all about Portraits but since we were exploring work from the National Museum in Stockholm, I still couldn’t squeeze this portrait in!
So I thought, why not share it with you here on the blog? It’s been a while since I did a detailed look at a painting so the timing is perfect!
Here’s the pastel portrait by Mary Cassatt of Mabel S. Simpkins:

And here’s what the gallery notes have to say about it:
“Portraits of friends and acquaintances abound in the work of Impressionist artist Mary Cassatt. This pastel marks a rare instance of a work completed while traveling in the United States, where Cassatt spent eighteen months, beginning in January 1898, after more than twenty years living in France. The work was given to the sitter as a token of friendship by the artist, but the unfinished quality of the pastel suggests the hurried nature of completing a drawing while traveling and away from one’s studio.”
It’s this unfinished look that I particularly love! There’s so much to see here if we look closely. So let’s do just that!
First, let’s take a look at the sitter’s face a wee bit more closely. There’s a lot of paper surrounding the portrait so this gives you something to come back to as we examine parts of her face.

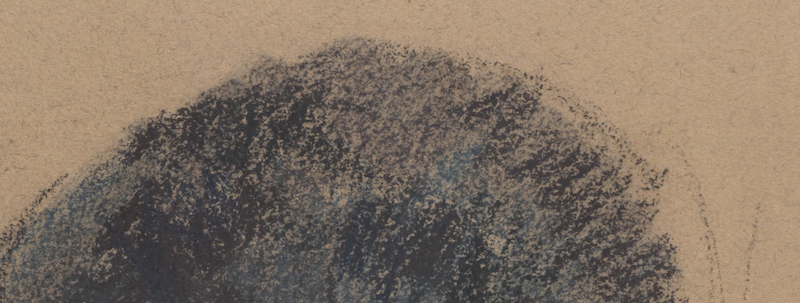
Starting at the top, have a look at how Cassatt treats the back part of Mabel’s hair. The pastel is applied lightly and loosely which leaves some of the paper colour to come through. This helps the top and back of the head recede and also gives it less importance. I also love seeing the original placement lines still visible!
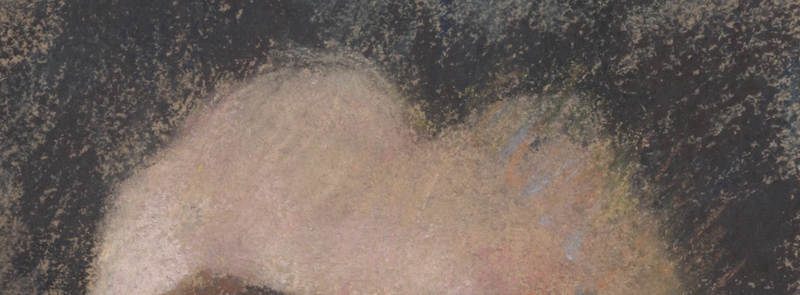
Now look at where hair meets skin. The pastel is denser than at the top of the head, covering more of the paper and framing the face. Can you see how Cassatt used hatching (with a number of colours!) on the right side to soften the transition between hairline and skin? Compare it with the harder edge on the lit side of the face.
And then we come to the eyebrows and the eyes. Ahhhhh…so much to examine here on Cassatt’s treatment of the eyes. I’ll mention a couple of things (and then you can mention the rest in the comments!). If you squint, you can see just how little of the eye the artist has indicated with a dark colour. There’s the edge of the top eyelid, the iris/pupil, and just a couple of marks on the lower lid which give the impression of eyelashes.
Look at the colour of the “white” of the eyeballs – not white at all!
And one more thing, can you see how Cassatt shows us the sitter glancing down rather than right out at us?

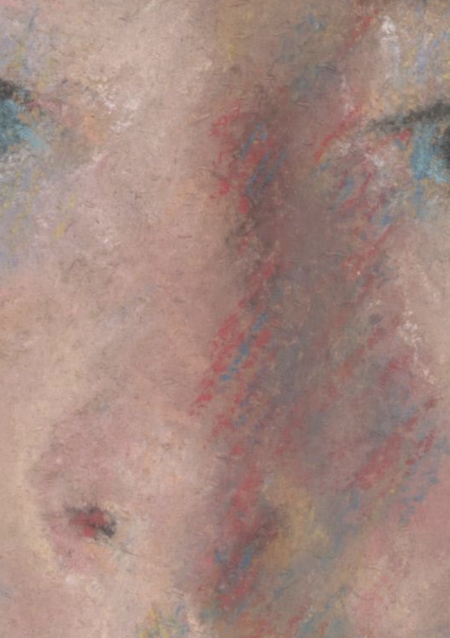
Right, let’s get to the nose. You can see how Cassatt put down a base pinkish colour and then added pops of pure colour on top. Look at the red in the left nostril. And the tiny curve of yellow on the left one. And what about those red and turquoise linear marks on the shadow side? If you look at the full portrait, what do they do for it?
Time for the mouth. Consider how much dark is used – only a hint of a line on the left side. And isn’t the mouth interesting in its imperfection? Somehow much of the character of Mabel Simpkins is revealed in this mouth. And in it, I can also feel the searching eye and hand of Cassatt as she worked. Can’t you picture the scene of artist and sitter at work??

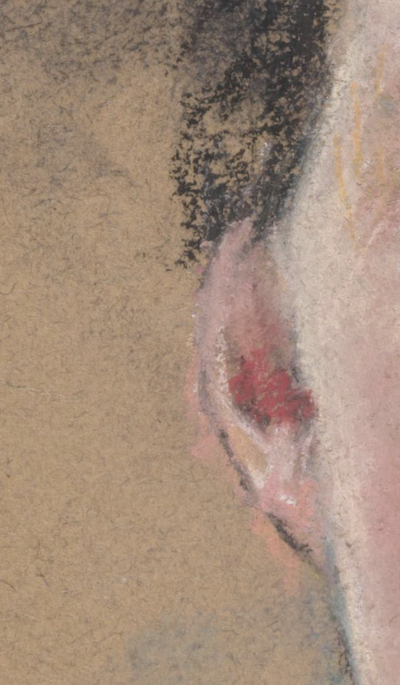
And what about the ears? You can see a line for the outline and then some smudges of colour for the inside area and then the lobes. Not much there but because of placement and value/colour and our own knowledge of the “human head,” we know exactly what they are meant to be!

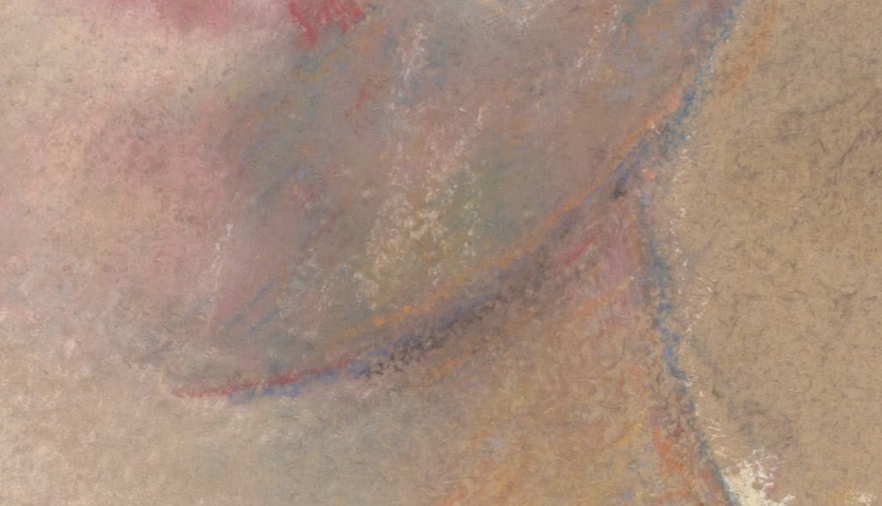
A couple more things I’d like to point out. First, the chin. Look at how the chin disappears into the neck on the left side. A perfect example of a lost edge! And then the visible edge is picked up on the right side with turquoise, a line of red, a line of orange, and the hint of a darker colour. So little there yet back away, and there’s the clear implication of shadow beneath the chin.

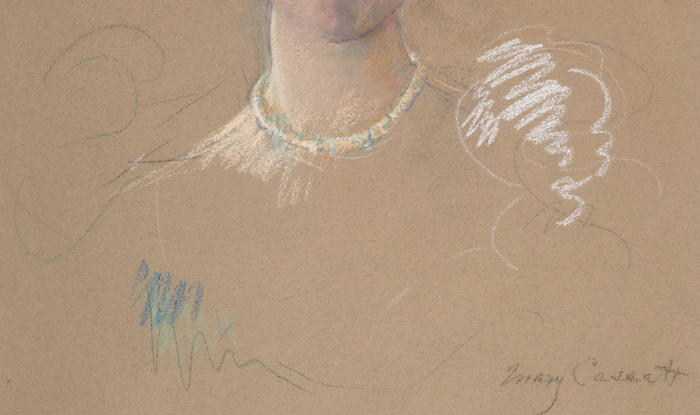
And finally, the dress. Not much is shown. Was it a time constraint or an aesthetic decision? Look at how we can still see Cassatt’s placement marks of the puffy sleeves of the dress and how the white pastel is merely scribbled in on the right to indicate the colour of fabric. Notice how Cassett ended up lowering the left shoulder.
Cassatt did include a necklace though at first I wondered if it was the top edge of a highcut dress. In the end, I decided that the dress was décolleté! And the colour of the fabric? That yummy combo of blue and green as shown in the few hasty marks on the left side.
Cassatt’s portrait is quite wonderful, isn’t it??
Here it is again in all its glory. You can now look it over with a keener eye!

A couple of other things to notice:
- How very little shift there is in value (lightness/darkness) across the face with just the barest amount of light indicated on the left side.
- The smudging around the portrait especially to the right. I love that we can imagine the hand of Mary Cassatt picking up pastel dust and moving it off the portrait. It seems so much a part of the creative process. And Cassatt obviously felt no need to “clean” it up!
- Cassatt’s choice of a warm middle-value paper and how that affects the outcome
I’ll leave it there. And I very much look forward to your observations so please do leave a comment.
Until next time,
~ Gail
PS. A few years ago (I can’t believe it was that long ago!!), I wrote about another pastel by Mary Cassatt.








12 thoughts on “Mary Cassatt And Her Portrait Of Mabel S. Simpkins”
You do such a nice job with these ‘closer looks’. Thanks for this one!
Thanks Susan!!
Thank You for a great article. Your comments really guided me in looking and seeing the essence of this wonderful portrait. I found it fascinating!
Yay Jane!! That’s what I hope for so thank you for looking and seeing more of what’s there!
I enjoyed your Blog on this portrait of Mary C. However, and probably most uncool to critique her work, I found (for my eye), I would have liked to see that same lovely face coloured shading continue down one side of her neck etc. As the portrait stands..the shading on her face alone seems to give that side of her skin a bit of a dirty/muddy appearance. My apologies in advance to Mary C. btw!
Hah hah! Jill thanks for being brave and critiquing Mary C’s work! I must say I had some trouble with the mouth. AND, I am reminded of the probably rushed nature of this work…Some leeway perhaps? 🙃
The simplicity of this portrait and your detailed observation and explanation is so informative. I, too, love the unfinished look. From afar, this is a painting I’d glance at and move on, but with your indepth critique there’s so much to see (mark making, color layering, unexpected color, shadows and more). Thank you, Gail, I loved this entry to your blog. You’ve inspired me to start a portrait of my adorable 2-1/2 year old granddaughter, however it will be from a photograph 🙂
I am an “Igniter” . . . now it’s time to study April’s lessons on portraits.
Yes, I agree, it’s one we may glance at and move on as you say. Which is why it’s such a treat to dig in here and really take time to look and SEE!
And I’m delighted it’s inspired you to get into a portrait of your granddaughter Barbara.
And yes, do get into the Portrait tutorial, demo and critique with our guest Mel Williamson. And don’t forget the Looking at Art session lol!! Thanks for being an IGNITEr!!
Thank you for that Gail. , you have the knack of encouraging an enthusiasm for picking up your pastels and getting started – love the use of the bare paper colour and unfinishedness of the work suggesting speed and a natural response to colour. Can’t wait to have a go .
And I can’t wait to hear what happens when you jump in! I’m glad this post has inspired you Elspeth!
This critique was terrific. I found as I went down from top to bottom, saying to myself, “Yep, that’s what I do, too!” But, as we got to the nose and mouth, I was reminded that I always struggle here. “Less is more” turns into overly done. And, i loved your pointing out that neck is lost and found, something that I always find hard to achieve in a portrait.
Thanks for the insight.
So glad you enjoyed it Roseann! Thanks for sharing where your struggles are when working on a portrait – and I had to laugh when I read, “Less is more” turns into overly done. Totally get that!