I am deeply grateful to have participated in a Richard McKinley workshop on Salt Spring Island, BC, Canada.
Richard McKinley, Pastel Society of America Master Pastelist and Hall of Fame Honoree, is renowned for his ability to teach. “He’s a great teacher” is the most common phrase I hear about this gentle, talented, and entertaining instructor. So I admit, yes, part of my motivation for taking the workshop was to see for myself how this admired artist taught. I wanted to learn what I was doing right and where I could improve and help students even more.
I also took the workshop to see how Richard McKinley works, his pastel painting process, and of course to pick up any new techniques and tips that I could add to my own art-making.
And I was not disappointed!
Happily much of what Richard covered in his instruction are areas I focus on when I teach. AND I did learn new things and I want to share these gems with you.

Richard McKinley Workshop Gem #1: Four-value Thumbnails And Notans
As you know if you’ve followed me for some time, I’m a huge fan (and dictatorial some would say!) of thumbnail creation. I do three-value thumbnails. Richard McKinley uses four values and then does a notan.
This was tricky for me as I’m deeply habituated to organizing my thumbnails into three values. But using three grey markers (light grey, middle grey and black) plus the white of the paper, I began to create in four values.
By the way, Richard’s thumbnails are very small, even smaller than mine. He also works with quite a bit of detail, certainly more than I usually include.
From the four-value sketch comes the
The
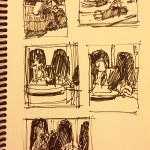
Have a look at a couple of my sketches and accompanying


Richard told me he used to make three-value sketches but when he began doing
Richard McKinley Workshop Gem #2 – Learning To Use Neutrals
You know I’m a colour freak
Well, Richard works the other way around! He starts with neutrals and greyed colour and then sparkles it up with more saturated colour as he moves forward.
Since I was in a Richard McKinley workshop to learn and not fall back on my own (comfortable) ways of working, I did the work as instructed. Yup. I put down greyed colours first!! EEK!
And you know what? I was quite pleased with what I ended up with! This once again goes to show that if you follow your value pattern, you have a better chance of creating a successful piece, no matter what the colour. Even with the neutral colour I used, the work felt designed and even colourful rather than merely grey.
(By the way, the week turned out to be mostly overcast and even rainy – not the best for a
Check out the piece below which I put together pretty quickly on the last day of the workshop. It’s pretty grey!!! (I’ve also included the thumbnails so you can see me working out the balance of lights and darks.)


Richard McKinley Workshop Gem #3 – Moving The Viewer Around A Painting
I’m very conscious about making sure a viewer’s eye moves easily around my painting. I’m intentional, for instance, about using contrast in value, colour, or/and edge, to make this happen.
Richard plans his composition around focal points that fall on an asymmetrical triangle. I LOVE this easy to achieve manipulation! It’s an unbalanced way of moving a viewer from focal point to focal point. You are the conductor showing the way. It’s your responsibility as the artist to guide the viewer where you want them to go.
By using an asymmetrical or “awk
Look at my awkward triangle here:

Richard McKinley Gem #4 – Responding To The Painting On Location
This was a biggie for me!
My usual way of working en
Richard, however, comes to a point in his painting while painting en
For me, this also explained why Richard can be painting on location for way more than an hour! There comes a point in his process when he is engaging more with the painting and less with the scene in front of him. This means if the light changes in the scene, it doesn’t matter.
I will definitely go forward with this idea of an intentional listening to the painting while on site, consciously responding to what it requires there and then.

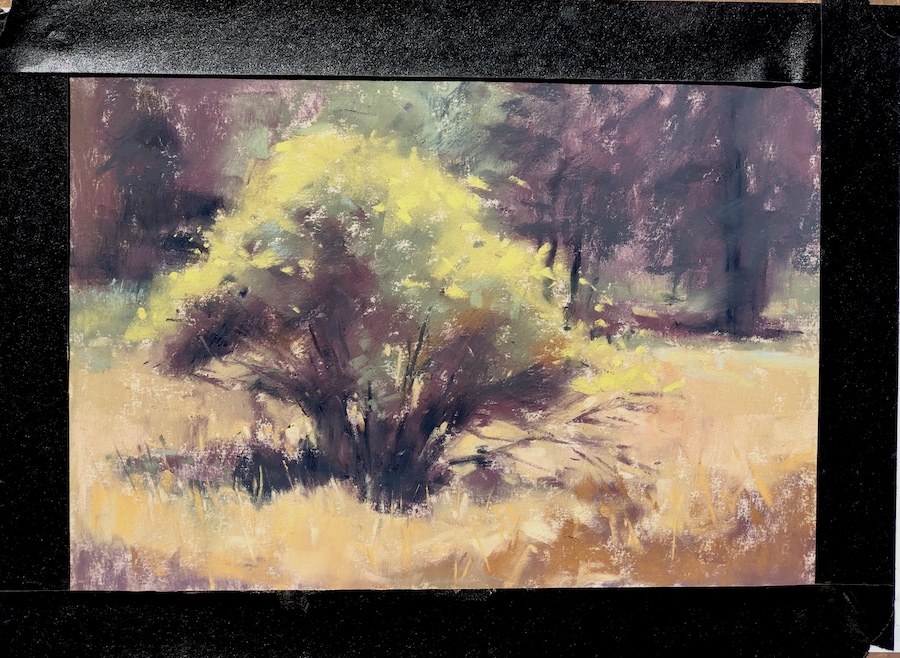
Richard McKinley Workshop Gem #5 – Changing To Black Tape
This one relates to Gem #4. And I love this one too!
When you start working on location, tape your paper to the support board using a white or off-white tape (drafting or artists tape for example). Then work away on the piece. As you feel you may be coming closer to finishing, you then take
This does two things:
- It tidies up the whole look of the piece, cleaning up messy edges
- It creates a new way of seeing the work
The black tape creates a window into your painting and you can quickly see what changes you may need to make.
Have a look at my piece with the white tape above and then with the black tape below. Although the lighting in the photograph changes in each due to the camera adjusting to the tape colour, I think you can still see the effect of changing to black tape near the end. It was amazing!
Richard McKinley Workshop Gem #6 – Wet Underpainting
I’m basically a dry underpainting gal. I don’t want to lug along more than I have to on a plein air expedition. Also, I don’t want to wait around for the painting to dry. So I’ve resisted experimenting with
Richard McKinley often does a wet underpainting and he demonstrated using rubbing alcohol on one piece and putting down watercolour on another. He explained that you need to have a mounted board for the use of watercolour but that you could get away with paper taped to a board using rubbing alcohol. (Be sure to know if the paper you use can take various kinds of liquid.)

I found I really enjoyed the rubbing alcohol version (which is wetting the first layer of pastel with the alcohol). On the other hand, I was frustrated using watercolour (which surprised me as I was looking forward to this!). Of course, I’ve only used each technique once so it’s hard to judge whether or not I’ll incorporate either of them over the long run.

I’m still a fan of carrying as little as possible en


Being a part of a Richard McKinley workshop really confirmed my own methods of teaching, both the things I cover as an instructor and what I consider to be important when working in pastel. This was a huge relief for me.
Where Richard really shines as a teacher is his incredible capacity to verbally articulate his ideas, his amazing inventory and use of stories that illustrate whatever he’s talking about, and his keen ability to come up with perfect metaphors and analogies to help students grasp the ideas he’s putting forth. He’s a very skilled and entertaining instructor and demonstrator (how he manages to talk through his demos is beyond me!). He’s also a kind, generous, and encouraging mentor. If you have the opportunity to take a Richard McKinley workshop, grab the chance.
We had a committed and diligent group of artists gather on Salt Spring Island for Richard’s workshop. I always love meeting people in ‘the real’ especially those who I’ve come to know in the two-dimensional digital world of Facebook and Instagram. I’m so grateful for the presence of each and every person at the workshop. They all contributed to the pastel conversation and made the workshop what it was. And my thanks to Michele Wells for her help in bringing this event to fruition!


And lastly, I want to say it was a privilege to spend time learning from and getting to know Richard.
I look forward to your questions, to your comments, to your sharing of your own experience being in a Richard McKinley workshop. So please leave a response below! Yeah!
Until next time,
~ Gail
PS. By the way, Richard continually referred to his book, Pastel Pointers, throughout the workshop. If you don’t have it, you should. It’s EXCELLENT!!!!!

PPS. Richard wrote a fabulous guest blog when I was first promoting his Salt Spring workshop. You can read it here.
Other books Richard McKinley recommends are the classics: Carlson’s Guide to Landscape Painting by John Carlson and Landscape Painting by Birge Harrison









![Pastels on black aper: Gail Sibley, "Untitled [at this point], Mount Vision pastels on Sansfix pastel card, 5 1/2 x 7 3/4 in](https://www.howtopastel.com/wp-content/uploads/2016/04/IMG_9649-2-150x150.jpeg)



41 thoughts on “A Richard McKinley Workshop – Notes From My Experience”
Thank you so much for this, Gail. It is such an excellent account of your experience during the workshop and gives so many insights into Richard’s techniques, and reasoning for them. I truly value and appreciate your blog on this subject. I have learned a great deal.
Bev I’m so glad you enjoyed it!
I really wanted to share the things that were new to me hoping that they’d be learning opportunities for everyone reading the post 🙂
Thank you for this blog, Gail. You’ve certainly captured the “gems”!
Richard is a most generous and patient teacher and an all-round nice guy! He knows how to get the best out of his students and bring them to an entirely new level.
The first time I picked up a pastel was 2 and a half years ago at a Richard McKinley workshop, and I was hooked! As a beginner to the medium he was patient and encouraging with me and I came away not only feeling my art journey was about to take off in a direction I really had no idea existed, but knowing I’d made a new friend.
In January we worked together again in Tasmania and I was reminded of all those Workshop Gems you’ve written about. I’d felt that in my busy life of full-time work my art had plateaued and needed a boost. So, even though I’m back at work and don’t have time to paint often, my art journey has certainly progressed, thanks to Richard.
In 2021 I plan to catch up with Richard again for our next artistic adventure, and I can’t wait!
PS I LOVE watercolour underpaintings!
Thanks Cathy for sharing your own art journeys with Richard. Having been in his workshop and getting to know him a bit more, I can totally see how he would have helped you gain confidence and knowledge. How lucky for you to have had Richard as your first pastel teacher! And lucky you, already planning your next pastel adventure with him.
Glad you like watercolour underpainting. I will be sure to give it a few more goes 😀
Hi Gail
It’s a great report about your workshop with McKinley. I envy you for this experience. Thank you for sharing gems. I will try them, too.
Yours Alexandra
Hi Alexandra, how lovely to hear from you!
The workshop with Richard was special and if you ever have the opportunity please go! (Richard does teach in France from time to time.) Look forward to hearing how some of these gems work out for you 😀
Wow, Gail, this is absolutely fantastic! So many new ideas and techniques to try out. I think I might find it easier to use four color values, so I’ll try this technique first. Note: For your untitled “triangular” painting, how about Lilac Morning (I see a sort of lilac blur around the trees)? Suggestion: On my version of the blog, I couldn’t view the authors of the books that Richard suggested. If you update this blog later, would you mind including them? Again, thanks so much — and thanks to Richard as well (his earlier writeup was also fascinating)!
So glad you liked it Ruth!!
And interesting title, I’ll for sure consider it 🙂
Thanks for letting me know about the book authors. I think I’ve rectified that.
And hey, by your reference to Richard’s earlier guest post, I know you read right to the end….and beyond. Yay you!
Thank you for sharing your wonderful experience with Richard McKinley. It had so many useful tips that will be so helpful.
Penny I’m glad to hear these tips will be useful to you!
Thanks so much for sharing the “gems.” So very helpful. A Walk In the Ruckles is gorgeous!!
You are so welcome Ruth.
And thank you for the compliment about my pastel!
Wow your workshop looked wonderful Gail. I think your work is different yet strong with the right principals. Thanks again for sharing. If I had known about the Tas.
Workshop I would have tried to be there. Jenny
Many thanks Jenny! Yes, even though I was using more greyed colours than usual, I think having a strong value plan provided me with what I needed.
And hey, Tasmania hasn’t happened yet!!
My first pastel (and only) workshop was with McKinley. Your comments about his ability to articulate his thoughts while painting are spot-on. I love color too, so planning the neutrals has become an important part of my process. Everyone is correct. Richard is a fine teacher.
Ahhhh Dana, you’ve been spoilt! I’m happy that you spent time learning in your first workshop from Richard McKinley. Grand start!
I encourage you to try a couple of other workshops with different teachers as they will bring their own leanings and flavour from which you can also learn.
Hi Gail,
As usual , it was wonderful reading your blog on Richard. 🙂 I already have his book and love his style of painting. Your writing was such a nice and personal insight into his work. Thanks so much for sharing pointers on his workshop and the key takeaway notes to improve pastel paintings.
I’m so glad Madhu, that you enjoyed my personal experience in a Richard McKinley workshop. Happy you have his book as he referenced it frequently through the workshop. It’s definitely the Manual!!
Thank you so much for sharing your wonderful experience with us, Gail! The thumbnail/notan and wonky triangle info is so interesting and valuable! I absolutely LOVE your Ruckle Park Grey painting…makes me want to use greyed down colors more! 😊 An interesting coincidence is that I just purchased Richard’s book, Pastel Pointers, about 2 weeks ago, and have been through it once already. There’s so much information in it, that I’m already looking forward to going through it again!
You are so welcome Jackie!! Glad you found some useful info. And yes, I loved the ‘wonky’ triangle idea too!
Thank you for your kind compliment about “Ruckle Park Grey.” In the critique that Richard did of everyone’s work, he did point out the greyness of every colour I used in that piece!
So glad you have Richard’s book. It will be a reference to go back to time and again!
Thanks so much, Gail, for this post. So informative.
BTW, some of the text was covered with some of the photos. We could see text behind the photos.
Glad you enjoyed it John!
Strange about the text/photo thing. Are you viewing on computer, tablet or phone? Perhaps you could email me a screenshot? I have to say I’m only a bit techy so not sure if I’ll be able to rectify the problem. Has this happened before or only on this post?
First, thanks SO much for arranging his workshop. Richard is an outstanding teacher…and loaded with relevant stories collected over his many years in the art world.
In addition to your five Gems, I came away with at least three more.
– Gem #6…bits and pieces or something like that. My way of painting used to be to apply pastel quickly, usually with the side of the stick. His way was is to apply small bits and pieces and work up to a finished painting slowly.
– Gem #7…paint with the same pressure as “the brush of a butterfly’s wing”.
– Gem #8…the standard approach is to lay down darks first, then work up to mids and lights. He lays down mids first, then “carves out” his darks and adds his lights. I’ll be trying out these approaches as well.
PS- I had a great time, learned some new approaches to pastels, met some great people (including you!), and gained a bit more belief in my abilities. What more could one ask…we’ll, maybe a bit more sun!
Hi Jeff,
Thanks so much for coming to the workshop!! Loved meeting you and seeing your fabulous work!
Love your Gem additions (and actually I had six….:-Q).
Gem #6 – yes! speed of application and process of painting time is definitely slower for Richard. Loved the ‘bits and pieces’ idea too
Gem #7 – I do paint very lightly at times so this idea wasn’t new to me (I decided to keep what was new to me otherwise the blog would have been endless!). Having said that, I’m glad you brought it up as it’s something I stress in my workshops. And of course I love Richard’s evocative expression!
Gem #8 – I like that you added this one. I tend to work my three values all over, from thin to thick, becoming more in more detail and edge quality as I bring the work to a close. Richard works a bit differently as you describe. It’s always wonderful to me to see the process an artist takes, what their journey is through a piece.
And yeah….a bit more sun would have been fab but I’m still happy we could get out for two full days without being rain-spattered!
Hi Gail!
It was great meeting you in person and seeing your wonderful paintings in person as well. You did a great job recapping the workshop. Richard is a fantastic teacher and a super nice person as well. I also enjoyed meeting like minded people from North America and beyond. Thank you for organizing the workshop. This was my second McKinley workshop and I plan on taking more.
Thanks again! (That’s the Canadian in me) lol
Hi Doug,
I LOVED meeting you and was sorry that you slipped away before I could say goodbye and thanks for coming!
Glad you liked my recap. I know there were a TON more gems from Richard but these were the ones new to me. Yup, Richard has everything going for him for sure. And gosh darn, he’s so nice as well!! I can sure see why you’d be taking more workshops with him. Mexico? France?
Thanks again for coming (lol!)
I was lucky enough to go to a Richard McKinley workshop in Vermont this past July. It was a great experience and I would highly recommend going to one of Richard’s workshops in the future.
This was such a good post. Gail , you summed up some of the same things that I learned as well. The bottom line is that Richard is an excellent teacher and very kind. I can’t wait to take another workshop from Richard in the future.
Thanks Elizabeth! You know exactly what I’m talking about having taken one of Richard’s workshops. He certainly leaves one elevated and hopeful. Let’s hope Richard keeps teaching for many more years!!
Hi Gail,
So many of these tips were new to me. Can’t wait wait to try them and take one of Richard’s workshops.
Thank you for generously sharing so much of what you learned!
Hi Susan,
Love to hear that these tips are new to you. Look forward to hearing how it goes when you give one or two a try. And yes, do take a McKinley workshop if you have a chance!
And you are so welcome 🙂
Thanks for sharing your personal experience with the Richard McKinley workshop. It is almost as good as being there! I love all the gems, but I especially enjoyed your thoughts on his style of teaching. It would be awesome to take a workshop with either of you. Although I would like to, I haven’t made the leap to teaching yet. I did take a short workshop from Albert Handell several years ago. It is interesting how those gems stay with us.
Sheila, so good to hear that my words took you right into the workshop 😀
And wow, you put me in the same sentence as Richard McKinley – I’m honoured! And I’d be pleased as anything to have you in one of my workshops.
One of the things that teaching does is have you starting to understand what it is you do, much of it automatically. You have to slow down and ask WHY you do something alongside HOW. It really does help your own work when you teach. I encourage you to try it, especially if you’ve been asked to do so.
And yes, the highly polished gems stay with us for sure!
Thanks Gail, those are all great tips and I love how brave you were to step outside of the comfortable and try new things. Beautiful work!
Thanks so much Maureen!
I decided I better practise what I preach since getting out of your comfort zone and trying something new is what I believe workshops are all about! 😀
Thank you for all this information..I wonder what SIZE tape you use (black and white) and which BRAND? I need to order some, thanks again!
Hi Flynn, Thanks for the question!
I use 3/4 inch to 1 inch depending on what’s available. Both the white artist tape and the black masking tape are by Art Alteratives.
Thank you for for bringing on all these gems from Richard McKinley, very inspiring…have gone through them all… what lovely pieces you came up with yourself!!
one question: “I follow one law: Is it archival?” what dos that mean (English is not my native language)?
Many thanks Susana!!
To your question: Archival means will it stand up to the passage of time. You want to choose materials that will be permanent eg pigments that won’t fade, paper that is PH neutral and that won’t yellow or crack over time. You never know when you will create something that may be worth keeping for many years. So experiment but use materials that won’t become fragile over time. Hope that helps!
That was so helpful Gail, thank you! Have come across that expression so many times. 🥰
Hi Gail,
Thanks for the detailed information and the gems on Richard McKinley’s workshop. I’ll be taking a workshop with him next summer and really looking forward to it.
His palette includes more greys/neutrals than I have. It looks like a third of his box is neutrals. How much did he emphasize this in your workshop? What neutrals do you use?
Your work is terrific, too. I’ll have to take a workshop from you as well.
Thanks, Marc
Hi Marc, I know you’ll have a fabulous time in Richard’s workshop. He’s a joy as a teacher and as a person.
My palette has very few greys/neutrals. So I went for the least saturated colours that I could find. There were a few as you can see from my posted images. I was surprised! I challenged myself to work the way Richard was working and teaching us as a way to expand my own experience with pastels. Since the workshop mind you, I’ve gone back to my happy place of colour and using colour layering to neutralize.
And thanks! I’d love to see you in one of my workshop!! 😀