I have been back and forth to Salt Spring Island over the past few weeks, visiting my Mum and Dad and painting on location. It’s been so wonderful getting back to plein air painting. The weather has been superb – warm enough not to need a sweater but not so hot as to be uncomfortable. Just perfect!
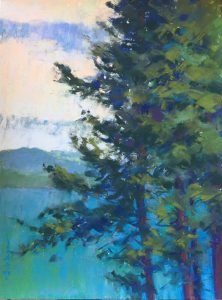
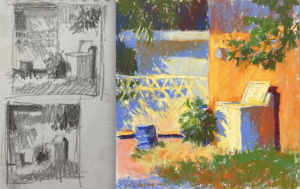
I thought it’s about time I started sharing what I’ve been up to. So here’s the progression of a pastel I did in Vesuvius on Salt Spring Island. (This was the one time I went out alone so you’ll have to wait for another blog post to catch sight of my parents at work!)
Let’s take a boo.


Gail Sibley, “Dowry House, Vesuvius,” pastel on Wallis paper, 12 x 9 in.

There is really nothing like painting on location!!
Here’s a quote about painting on location that I think is so true.
Feel free to Pin it if you agree!
You can see some of Charles Muench’s work by clicking here.
Painting on Location – upcoming video and contest!
On another topic, as you may have noticed in my Summer Newsletter, I’m working on a video about painting on location that will be for sale. I would love your input as to what information you would like to see included. What are your questions, your hesitations, about pastelling en plein air? Please let me know in the next few days as I am hoping to finish the voiceover and editing next week. Anyone who offers some input will be included in a draw for a free copy when I release it!! So come on, ask away!
Thanks for being here. You know I’d love to hear your comments about this post!
Until next time,
~ Gail
















18 thoughts on “Painting on location at Vesuvius on Salt Spring Island”
How do you avoid filling up the tooth in just a couple of layers? Do you work very lightly? I try to do that but find that the tooth is filled too quickly. If I try to pop a white highlight onto a lemon or apple, it barely shows because there are two other colours beneath it. Very frustrating!
I’m working on Canson Mi-Teintes pastel paper.
Thank you for the regular emails, Ms Sibley. Your work is inspiring.
Stephen
Stephen, Canson Mi-Teintes paper is fine when you don’t need/want to build up layers. What you need is a sanded paper. There are many options out there. I am now partial to Wallis paper but at the moment, it is pretty much unavailable and lots of artists are having to find an alternative. Many are turning to UArt paper. (Luckily I have a bit of a stash of Wallis paper!) Other sanded surfaces are La Carte, Ampersand’s Pastelbord, Art Spectrum’s Colourfix, and Richeson’s Unison Pastel surface. I am sure there are other brands but these are ones that come to mind. To find what you like, it’s best to try them out as they are all a bit different.
The other thing that will affect the application of pastel is the pastels themselves. You didn’t mention what pastels you are using. The softer they are, the more you will be able to achieve that popping highlight. I do work fairly lightly at the beginning and as I near the end, I apply the pastel much more firmly.
I hope that helps!
So glad you are enjoying my emails 🙂
Gail
Love the plein air , its my favourite means of painting in the summer , going to paint Annapolis Royal in 10 days time ,along with80 other artist!!! lots of fun ,cheers Rae
Wow – have fun!! 80 other artists – that should be a riot 🙂
Your step by step demos are so helpful (Including what pastels and substrate you use). Dowry House, Vesuvius, helped me see how to build the layers. I hope your new plein air video will show/talk about what to include and more importantly ‘what to leave out’ of a landscape scene.
Thanks Pema. I am glad this post has helped you. Thanks too for your input on the plein air video – a good consideration which I will cover 🙂
Have never tried plein air painting, but would love to give it a try. Hope you go over supplies & set up as well as choosing a good site.
Deb, Yes, give it a try!! Thanks for input on video. I will be covering those things for sure!
Gail,
I love watching the progression of the paintings! That is the most helpful thing for me!
Mary Jo
So glad it’s helpful Mary Jo. There will be more coming!!
Really nice pastel. In my mind it’s finished but then I am not an artist. Have always liked the work you and your family have done while painting in this manner. S.
Thanks Sandy. I am thinking it may be done. Will have to take another look….
Wow, I love to paint on location. It forces me to paint all over the canvas (pastel paper) at once as the light changes so quickly. Thank you for your work. ~~~ David Attwood
Good point David, about the quickly changing light! Glad you are enjoying my work 🙂
Ive only done this in the moment outdoor painting in watercolors. I may try the pastels after seeing your demonstration. Loved the simple capturing of the daisies. I have lived on SaltSpring in the 70s and did my 1st en plein air watercolor at Vesusius Bay.
Thanks so much Moneca. A lovely story about you doing your first plein air in Vesuvius Bay. It’s such a lovely place to paint. Where do you live now??
Do pull out pastels and try them 🙂
Love your vibrant work. Inspires me to try new color combos.
I have trouble standing at an easel for plein air. Do you have ideas for painting sitting down? How do I keep things at hand without lugging around too much stuff. Need a bare minimum list of what to take. I don’t want to take things I won’t use 🙂 Thanks!
Thanks so much Debi! When I am travelling, I don’t take my easel with me – too much to haul especially by air. What I do is find a bench, a chair, a rock, a step, whatever I can, and set up there. It works fine. The main thing I find is that I don’t get up and look at the pastel from a distance nearly as much as I do when I am at an easel.
With regards to supplies, I take paper mounted on foamcore, a small box of pastels (and I mean small), a small tray (like the ones meat comes packaged in) to dispense pastels into, some toilet paper for cleaning up. That’s the basics.
I will be releasing a course on plein air very soon and all this is discussed in it. 🙂